Bookmark This
  • Our Gaming Emulators GuideGAMING
  • Why I Believe That Video Game Piracy Is A Good ThingOPINION
  • Cake CrumbsPEOPLE
  • Beggars of The InternetSOCIAL MEDIA
Our Gaming Emulators Guide1 Why I Believe That Video Game Piracy Is A Good Thing2 Cake Crumbs3 Beggars of The Internet4
http://wowslider.com/ by WOWSlider.com v8.5

How To Disable 'Articles For You' and Get The 'Bookmarks' and 'Recent tabs' Buttons Back in Google Chrome Version 60 for Android

with
Since the new version 54 update enrolled on the Google Chrome of Android, it replaced the 'recent tabs' and 'Bookmarks' buttons on the homepage with 'Articles for you', which is basically random news posts from different websites. And on version 60, they altered the previous method of disabling the 'Articles for you' and getting the bookmarks back.


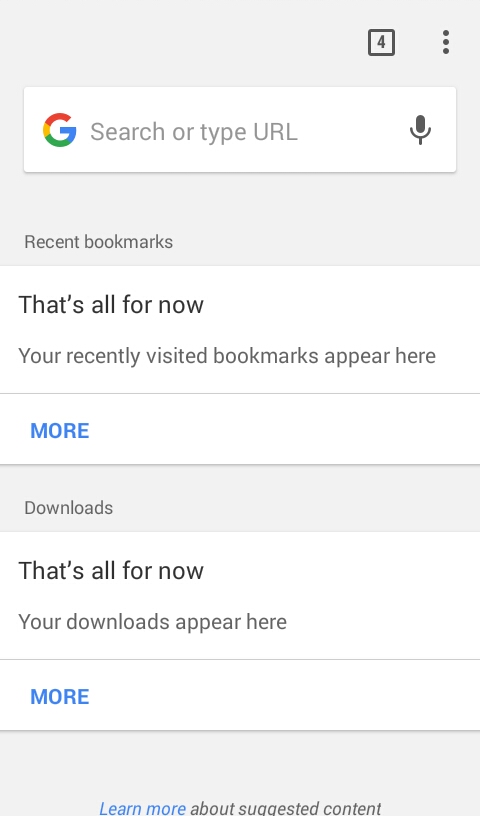
The 'Articles for you' homepage in Chrome version 60.


Several people are having trouble figuring out how to remove the 'Articles for you' from their Chrome and go back to the usual homepage with the 'Bookmarks' and 'recent tabs'.

Here's how you can get the original home screen with the bookmarks and recent tab buttons back and disable 'articles for you':

Firstly, open Chrome on your Android device, and enter this url in the address bar:
chrome://flags/#enable-ntp-popular-sites

The url will open this screen.


Afterwards, tap on 'Default' on the 'Show popular sites on the New Tab page' option, and choose 'Disabled' from there.


Then, open this url in your address bar:
chrome://flags/#enable-ntp-remote-suggestions


The url will open this screen.


Then tap on 'Default' on the 'Show content snippets on the New Tab page', and choose 'Disabled' from there.


After that, simply relaunch your Google Chrome and the homepage will be back to normal, with 'Articles for you' disabled and 'Bookmarks' and 'New Tab' buttons back. That's all!


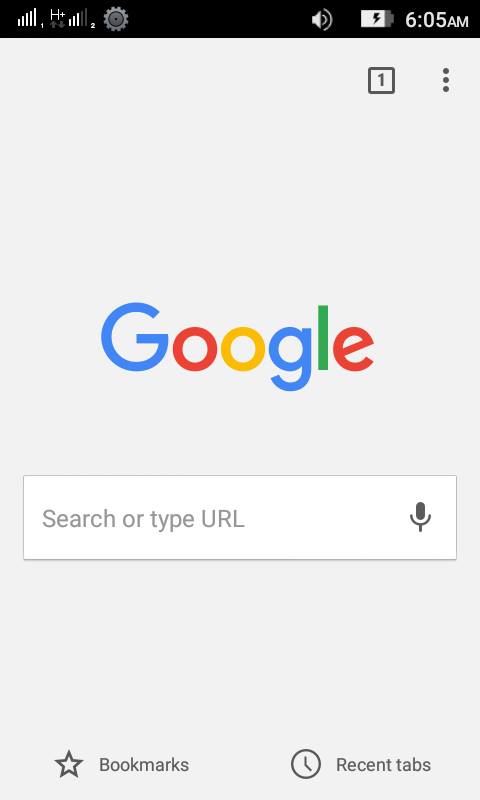
Back to the normal layout.
READ THIS
Published On Entertainment Ghost At Sunday, September 10, 2017

How To Disable 'Articles For You' and Get The 'Bookmarks' and 'Recent tabs' Buttons Back in Google Chrome Version 54 for Android

with
Since the new version 54 update enrolled on the Google Chrome of Android, it replaced the 'recent tabs' and 'Bookmarks' buttons on the homepage with 'Articles for you', which is basically random news posts from different websites.


The 'Articles for you' homepage in Chrome version 54.


Several people are having trouble figuring out how to remove the 'Articles for you' from their Chrome and go back to the usual homepage with the 'Bookmarks' and 'recent tabs'.

Here's how you can get the original home screen with the bookmarks and recent tab buttons back and disable 'articles for you':

Firstly, open Chrome on your Android device, and enter this url in the address bar:
chrome://flags/#enable-ntp-popular-sites


The url will open this screen.


Afterwards, tap on 'Default' on the 'Show popular sites on the New Tab page' option, and choose 'Disabled' from there.


Then, open this url in your address bar:
chrome://flags/#enable-ntp-snippets


The url will open this screen.


Then tap on 'Default' on the 'Show content snippets on the New Tab page', and choose 'Disabled' from there.

After that, simply relaunch your Google Chrome and the homepage will be back to normal, with 'Articles for you' disabled and 'Bookmarks' and 'New Tab' buttons back. That's all!


Back to the normal layout.
READ THIS
Published On Entertainment Ghost At Thursday, October 27, 2016

SoftEther VPN Client Manager with VPN Gate - Installation and Usage Guide

with


Are you looking for a VPN that is rich with options and is also free of cost? Then the SoftEther VPN is a good choice, that is rich with features, is free and is also open source. 

The SoftEther VPN is a free open-source project at the University of Tsukuba, Japan. 

Unlike most VPN Clients out there, which cost money and only encrypt your browsing, the SoftEther VPN creates a new Virtual Network Adapter and secures and encrypts the full connection, not only the browsing.

Here you will learn how to use the SoftEther VPN with the VPN Gate plug-in. The VPN Gate plug-in allows you to choose and connect to the VPN Servers easily, and you can get the list of the latest VPN Servers from it.

This guide is an easy-to-follow guide that is focused on easy and fast use of the VPN client, that anyone can read and easily understand. The guide does not cover hard and brain-twisting options of the VPN client.

First of all, download the SoftEther VPN Client with VPN Gate Client Plugin, which consists of both the SoftEther VPN Client and the VPN Gate Client Plugin. After downloading, unzip the package. Then run the .exe file from it.


Click 'Next' after the setup opens.


Select the "SoftEther VPN Client" and click 'Next'.


Agree to the 'End User License Agreement' and click 'Next'.


Click 'Next' when this screen appears.


Either select the default installation directory, or specify one based on your choice, then click 'Next'.


The installation screen.


 After the setup finishes the installation, click on 'Start the SoftEther VPN Client Manager' and run the program.


Click on "Add VPN Connection", as you click, it will ask you to create a 'Virtual Network Adapter'(see in the picture below). Click 'Yes'.


 Give your 'Virtual Network Adapter' the name you want and click 'OK'

.


The 'Virtual Network Adapter' creation in progress.


Now you will see your new 'Virtual Network Adapter', click on the "VPN Gate Public VPN Relay Servers" to choose from the VPN Servers.


Click 'OK' and you will see all the available servers.


Here, you can see all the servers with their locations, IPs and link speed, along with other information. Choose the server you want to connect to, and click on "Connect to the VPN Server". 


Choose the recommended protocol(which is selected by default) and click 'OK'.  


Now you are connected to the VPN.


 To disconnect the VPN, right click on the 'VPN Gate Connection' and click on 'Disconnect'.


When the SoftEther VPN Client Manager is connected to the server, you will see an animated icon of the SoftEther VPN Client Manager in your taskbar, You can right click on the icon for quick options.

READ THIS
Published On Entertainment Ghost At Monday, October 13, 2014

Windows 10 Technical Preview: Installation and Hands-On Preview

with
So you want to get your hands on the new Windows 10 Technical Preview, see a hands-on experience, or both? Then you're at the right place! Here, you'll learn how to get your hands on the preview and also see a hands-on experience with it.

If you want to download the Windows 10 Technical Preview, you can get it from here. if you want to try Windows Technical Preview for your company, download enterprise edition version from here.

Before downloading and installing the technical preview, please note that it is not polished and is not completely stable, but it is a rough build with lots of bugs and Microsoft recommends that you install the technical preview on a secondary computer.

We recommend you to be sure to read the Privacy Statements for the Windows 10 Technical Build. Here are some important ones:
  • When you install the Program, we may collect information about your device and applications and use it for purposes such as determining or improving compatibility,
  • When you use voice input features like speech-to-text, we may collect voice information and use it for purposes such as improving speech processing,
  • When you open a file, we may collect information about the file, the application used to open the file, and how long it takes any use it for purposes such as improving performance, or
  • When you enter text, we may collect typed characters and use them for purposes such as improving autocomplete and spellcheck features.

After you have downloaded the Windows 10 Technical Preview ISO, open it with the windows explorer or the program you uses to mount ISO images. Run 'setup.exe' from the drive and your Windows will load the set-up and a  'License terms' screen will appear. Then, the 'Checking For Updates'(see below) screen appears.


Set-up loading in process.

The license terms screen.


The ready to install screen after the set-up successfully loads.


You can now choose to install the preview and whether you want to keep your settings, personal files and applications on your computer.

However, you can change installation type by clicking on "Chose what to keep".


Here you will see three options, If you chose the option 'Nothing', Windows will format your Drive C or the partition in which you have the previous OS installed. If you choose 'Keep personal files only', your files will be safe, but your settings and applications will be removed. If you select "Keep Windows settings, personal files, and apps", you will keep all of your files, settings and applications.

Once you've selected the options of your choice, click the 'Install' button and the installation begins.


Windows 10 Technical Preview being installed.


The installation screen warning the user about the computer being restarted.


The installation reboots the computer and after it comes back, it installs further and after the installation is complete, you see the 'Getting devices ready' screen and then it says 'Getting ready'. After that, you can set the time and date and after that, you get settings similar to Windows 8, such as whether you want to use apps' location or not, and other similar things. Then, you will be asked to either make a Microsoft account or a local account, and then Windows will say 'installing apps' and other similar text, then the computer will finally go inside the Windows.


Desktop on the first boot. Here you will see two new buttons in the task bar. The buttons are 'Search' and 'task view'. You cannot unpin these buttons.


Some applications may not run on the Windows 10 Technical Preview and give you this error. Some anti-viruses do not work on the technical preview, such as avast!. However, many still work such as the AVG anti-virus. Microsoft fixes bugs over time through updates, so there is a possibility that Microsoft might fix these issues through an update as well.


You can resize, uninstall, unpin, and turn-off live preview of the tiles in the Start Menu, by right-clicking them just like in Windows 8.


An example of resizing the tiles.


You can turn remove the tiles from the Start Menu and have a classic Start Menu, however, the search still finds results from both your computer and the internet, which is a Windows 8.1 addition to the search.
You can remove the Bing search by simply going to PC Settings > Search and Apps > Search and turning the metered connection options off.


The Windows 10 Technical Preview's search  comes with the Bing search engine. If you never use Bing search, you may find this feature not rather useless. 


The apps open in the desktop by default. You can make them full screen as opposed to using them on the desktop/windowed, and you can access the applications' options by clicking on the menu from the top of the left side of the application.


The new Windows 10 Technical Preview snap in action.
You can now 'snap' 4 applications on a screen at the same time in the Windows 10 Technical Preview.


The Taskbar Start Menu Properties in the Windows 10 Technical Preview
The Windows 10 Technical Preview comes with the Start Menu by default. If you prefer the Start Screen instead, you can get it back from the "Taskbar and start menu properties", which you can open by simply right-clicking on the Taskbar, then going to it's 'properties' and then clicking on the 'Start Menu' tab.


The task view button in action in the Windows 10 Technical Preview.
The 'task view' button in action.

The task view button in action in the Windows 10 Technical Preview.
Unlike the 'virtual desktop' software, which can create new and full desktops, in the Windows 10 Technical Preview, the 'Taskbar' shows each opened application currently opened in other  desktops.


You cannot open the 'Charm Bar' by pointing the mouse on the right corners of the screen anymore, like you could in Windows 8 and 8.1. Instead, you will need to use the Windows' shortcut keys(Window+C) in order to open the Charm Bar.

These are the latest additions to the Windows operating system, and the most important ones. However, this is definitely not the final version of Windows 10, and through feedback and time, Microsoft will be constantly updating the Technical Preview and fixing it's bugs, and possibly, expanding it's application comparability.


Have you joined the Insider Program and tried out the Windows 10 Technical Preview yet, or are you going to wait for a more stable build? Leave your comments, feedback, opinions and issues in the comments section below!
READ THIS
Published On Entertainment Ghost At Saturday, October 04, 2014

The Complete Guide To Manage Google Chrome's Supervised Users

with


Google has just added a new feature called "Supervised User Account" which allows you to see all browsing activity, block sites/sub-domains, and other cool features to ensure your child's not going on all those sites you don't want him to see, which we earlier mentioned here. Here is the complete and easy guide on how to use this new feature and maintain the online activities of the supervised users!


Getting Started


First, you need to be signed into Chrome Sync, which you can do by clicking on Chrome > Chrome Menu > Sign in to Chrome.

Creating Profiles


After you sign-in to Chrome, click on the Chrome Menu  and click on "Settings" and there, click on "Add New User". or simply copy this "chrome://settings/createProfile" address and paste it in your Chrome browser and press enter.


Now create a new user profile, enter the desired name and check/tick the "This is a supervised user managed" box and click create.


 After creating a "supervised user" profile, Chrome will show you a pop-up and sent an e-mail to you about the supervised user account's way of usage and other information.


Managing Users

You can manage all "supervised users" from https://www.chrome.com/manage.

Supervised User Manager

On the Supervised User Manager you can see all user activity which includes website names, address, visit time, day, removing users, granting permissions and responding to in-coming user requests and controlling search safety.


  Using Supervised User Manager

If you want to allow only specific sites to the supervised user account, click on "Manage" under the "Permissions" section and choose "only specific sites" from the menu and then add the desired site addresses and click on "Ok". You can block a whole domain and/or allow only sub-domains from a full site, by choosing the different options under the "Behavior" section.


To block specific sites click on "Manage" and enter the address of the sites you want to block and click on "Ok". You can block whole domains, or block only specific addresses or just allow sub-domains from a full site, by choosing the different options from the "Behaviour" section.


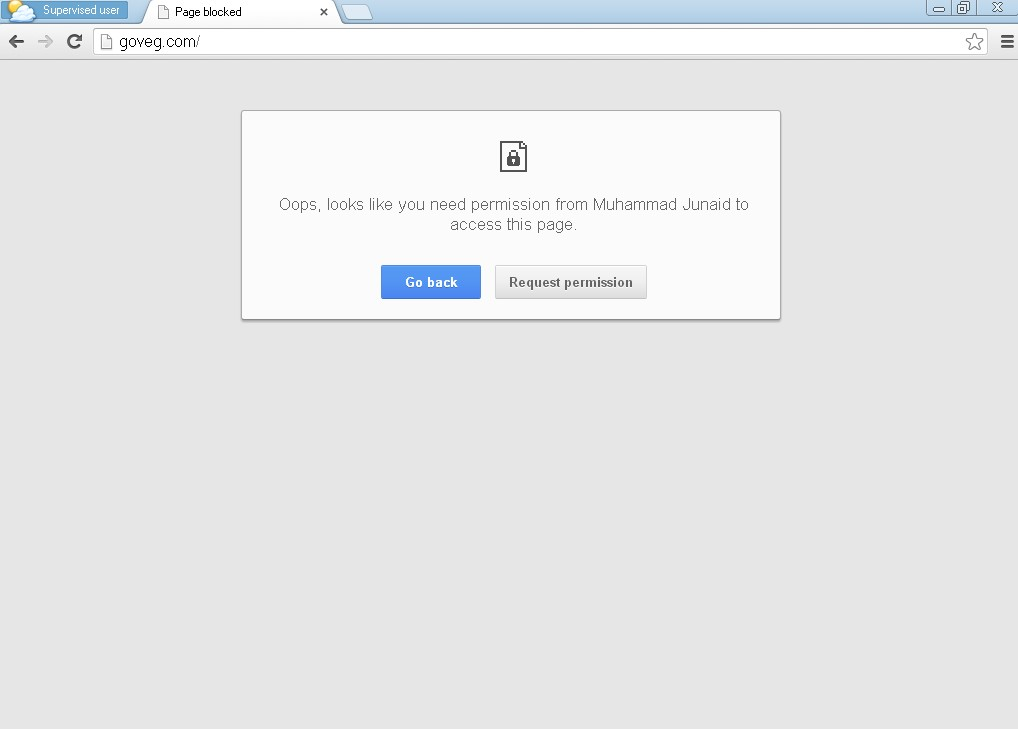
While a supervised user account is trying to access blocked sites, the user will see a notification saying "You need a permission from - Your Name- to access this page" and the user can send you a request asking you to allow that site, which you can allow or deny the request from the manager.


This is an example picture showing an active dashboard of a manager account which displays requests, browsing activity, and blocked sites:


READ THIS
Published On Entertainment Ghost At Wednesday, January 15, 2014